Start simple: a step‑by‑step guide to using an undated weekly planner without feeling overwhelmed
Contents
- Why a simple weekly planner works
- Choosing the right undated planner
- Setting up your first week
- Daily routine: top priority and quick tasks
- Mid-week check-in: staying flexible
- End-of-week review and reset
- Common overplanning pitfalls to avoid
- Micro-tip: the 3-task rule
- Optional next step: explore a weekly planner
It’s Monday morning. You’ve poured a cup of coffee, opened your laptop, and stare at a long list of tasks that seem to grow each time you glance at them. The feeling of “too much to do, not enough time” settles in, and the idea of planning feels like adding another layer of pressure.
Instead of reaching for a digital calendar or a complicated system, you pick up a plain, undated weekly planner. The pages are empty, waiting for you to decide what matters most for the next seven days. Because the planner isn’t tied to a specific date, you can start whenever you’re ready, and you can move tasks without feeling like you’ve missed a deadline.
In the next few minutes, you’ll discover a gentle routine that helps you choose a few realistic priorities, leave room for the unexpected, and finish each week with a quick, low‑stress review. The goal isn’t to fill every line, but to create a simple habit that supports focus and clarity without overwhelming you.
What is an undated weekly planner?
An undated weekly planner is a planner that lets you write the dates yourself rather than following a pre-printed calendar. This means you can start at any time of the year, skip weeks without wasting pages, and build a planning routine that fits your own schedule.
Why a simple weekly planner works
Keeping a planner simple means you can glance at a single page and instantly see the week ahead. A clean layout eliminates the clutter that slows decision‑making. When only a few time blocks appear, the brain spends less effort sorting information and more on actually completing tasks. This drop in decision fatigue often leads to a calmer start each day.
A straightforward method is to record just three core tasks per day. On a Monday you might write: 1) finish the client report, 2) walk the dog after lunch, 3) call Mom in the evening. Place these items in the left‑hand column of the weekly spread, leaving the remaining space empty or reserved for brief notes. Limiting yourself to three items prevents over‑scheduling and lets you quickly gauge whether the day feels realistic.
Why this works:
- Clear visual cue of priorities.
- Reduced mental load when reviewing the week.
- Flexibility to shift tasks without feeling constrained.
- Room for spontaneous ideas or self‑care moments.
Simple planning habits vs overplanning habits
The table below highlights the difference between planning habits that support a calm, sustainable routine and those that commonly lead to overwhelm.
| Planning habit | Supports calm planning | Often leads to overwhelm |
|---|---|---|
| Choosing one top priority and up to three core tasks | ✓ Clear daily focus | ✕ Long, unrealistic task lists |
| Leaving buffer time between activities | ✓ Easier to adapt when plans change | ✕ Every hour scheduled with no flexibility |
| Reviewing your planner mid-week | ✓ Adjusts to changing priorities | ✕ Following an outdated plan |
| Using an undated weekly planner | ✓ Start whenever you’re ready | ✕ Feeling guilty about unused dated pages |
| Keeping space for notes and ideas | ✓ Captures thoughts without clutter | ✕ Trying to remember everything mentally |
| Completing a short weekly review | ✓ Starts the next week with clarity | ✕ Carrying unfinished tasks forward without reviewing them |
Choosing the right undated planner
When you begin using an undated planner, the initial choice is how it will sit within your daily routine. Since the pages are blank, you can set a rhythm that feels comfortable. A planner that aligns with your preferred writing area often lessens the temptation to over‑plan. Choose a layout that displays the entire week at a glance while keeping the page uncluttered. This simple decision can establish a calmer planning habit.
Weekly spreads typically appear in a few formats. A horizontal view places each day side by side, useful for thinking in time blocks. A vertical view stacks the days, providing extra space for notes. Some designs offer a straightforward list with three priority slots per day, keeping attention focused. Select the format that reflects the way you naturally organise tasks.
When you compare options, ask yourself these quick questions:
- Does the layout give me enough space for my three core tasks?
- Can I write comfortably with the paper thickness I prefer?
- Is the binding flexible enough to lay flat when I’m adding notes?
- Will the size fit on my desk without taking up too much room?
Emma experimented with a planner that used a horizontal week view. She appreciated being able to draw a thin line under each day and record just three items – a meeting, a personal errand, and a brief note for the next day’s top task. After a week the pages remained tidy and she felt less pressure to fill every hour. If a vertical list feels more natural, rotate the planner or select a layout that stacks the days. The essential point is to choose the format that is quickest to scan and update.
Setting up your first week
Begin by turning to a fresh page for the week ahead. Spending a few minutes reviewing the past seven days can be useful. Jot down one or two successes – perhaps you finished a report early or walked the dog each evening. Then capture any loose ends, such as a missed call or an unfinished grocery list. This brief review gives your mind a clear picture of where you left off, allowing you to enter the new week without hidden clutter.
Next, decide on the three most important items you want to achieve this week. Keep the list short; a common approach is to pick one core task for each day and a couple of supporting items. On Tuesday, you might write “draft project outline” as the top task and add a note to “reply to client email” later in the afternoon. Limiting yourself to a handful of priorities reduces the urge to over‑schedule and creates space for unexpected moments.
To transfer these ideas onto the weekly spread, follow a simple routine:
- Look at any fixed appointments in your digital calendar and copy the times onto the paper page.
- Place your three core tasks in the morning or first half of the day, when energy is usually higher.
- Block a 15‑minute buffer between activities – it helps you stay relaxed if something runs long.
- Leave at least one empty slot each day for a quick review or a self‑care break.
After you’ve filled the page, step back and read through it. It should feel doable, not packed. A quick glance at the week’s layout often provides confidence to start each day with a clear purpose.
Daily routine: top priority and quick tasks
When a day feels scattered because every to‑do item competes for attention, choosing a single top priority and limiting the rest to a few quick tasks can restore calm. The top priority is the one action that, once completed, makes the day feel successful – a meeting that moves a project forward, a report that must be sent, or a personal habit you want to maintain. Placing it prominently in your planner eliminates the mental tug‑of‑war that often leads to procrastination.
Try this short routine each morning:
- Write the top priority in bold or underline it.
- Identify up to three quick tasks that take 5‑15 minutes each.
- Place those tasks underneath the priority, using check‑boxes.
- After the priority is finished, move on to the quick tasks – checking them off creates a sense of progress.
If you have a client call at 10 am tomorrow, write “Call client – 10 am” as the top priority. Then add “Send follow‑up email (5 min)”, “Order office supplies (10 min)”, and “Stretch break (5 min)” as quick tasks. By the end of the day you’ll see a clear line of achievement without feeling overloaded.
Mid‑week check‑in: staying flexible
By Wednesday you have a clearer picture of how the week is actually unfolding. The original plan can feel tight when unexpected meetings or longer‑than‑expected tasks arise. A short mid‑week check‑in lets you see where you are, decide what still matters, and give yourself room to breathe with flexible planning, without scrubbing the whole page.
Take a moment on Wednesday afternoon with a pen in hand. Scan the weekly spread and ask three simple questions:
- Which tasks are still on track?
- What new commitment has appeared?
- Is there a task that can shift to later in the week or be split?
You might notice that a client call shifted from Tuesday to Thursday. Rather than cramming the original Thursday task into the same slot, move it to Friday morning and insert a brief 15‑minute buffer before the call. This small adjustment keeps the day realistic and eases the urge to rush.
When you make adjustments, keep the changes visible. A light colour or a simple arrow can indicate the new placement, showing that the plan is alive rather than a rigid contract. If a task no longer feels essential, consider dropping it or turning it into a quick habit‑check (e.g., “send follow‑up email”). Treating the planner as a flexible guide protects your focus and reduces the stress of forcing everything into a fixed schedule.
End‑of‑week review and reset
At the end of each week, take a few minutes to look back and clear the board for the next round with a simple weekly planning reset. This pause helps you notice what worked, what didn’t, and where you may be carrying unnecessary stress into the weekend.
A quick routine works well:
- Mark three things you completed well. A brief win list keeps the focus positive.
- Identify any tasks that slipped. Write them on a sticky note and decide if they belong on next week’s list or can be dropped.
- Note a single lesson or adjustment for the coming week – such as “schedule a 10‑minute buffer after meetings”.
Finally, close the week with a brief reset. Clear away any loose papers, erase stray marks, and set your planner to a fresh page. A tidy spread makes the next Monday feel less like a mountain.
Micro‑example: On Friday at 6 pm, Sam writes down “Finished client report, walked the dog, called Mom”. He then moves the unfinished “order office supplies” to next week’s top three tasks and adds a note to check inventory on Monday morning. After a brief stretch, he flips to a clean weekly page, ready for a calm start.
Regularly practising this short ritual can reduce rumination and give you a clear mental break. As the habit builds, ending the week with a review and reset turns planning into a gentle rhythm rather than a chore.
Common overplanning pitfalls to avoid
When you first open a fresh weekly planner, the instinct is often to fill every box. Scheduling each hour feels productive, but it can quickly turn a simple tool into a source of pressure. Planning every minute leaves no room for unexpected calls, short breaks, or the natural ebb of energy. The result is a planner that looks busy on paper while feeling heavy in the mind.
A typical day may end up with ten or more tasks listed. Ambition is valuable, yet such a long list frequently means nothing gets fully completed, and unfinished items spill over into the next day. A gentler method is to choose three core items that truly move you forward, treating the rest as optional or “nice‑to‑have” tasks that can shift if time allows.
Below are common pitfalls and a simple adjustment for each:
- Filling every time slot – leave blank blocks for flexibility.
- Writing more than three tasks per day – keep a short “top three” focus.
- Skipping the weekly review – spend five minutes at week’s end to move unfinished items.
- Using the planner only as a to‑do list – add a tiny space for gratitude or a quick win note.
Micro‑tip: the 3‑task rule
A long to‑do list can feel like a wall of work, making it hard to start. The 3‑task rule keeps the day focused by limiting the core items you write in your planner to three realistic actions. When you have only three clear targets, you spend less time deciding what matters and more time actually doing it. The rule also leaves space for unexpected events, so the page never looks crowded.
Here is a simple way to try it tomorrow: after your morning coffee, open your weekly planner and ask yourself, ‘What are the three things that will move me forward today?’ Write them down in order of importance. You could write:
- Reply to the client email about the project brief (10 minutes).
- Draft the introduction for the quarterly report (30 minutes).
- Take a 15‑minute walk to clear your head.
Once the three tasks are on the page, you can add a short line for any small errands that pop up, but you keep the main focus on the trio. At the end of the day, check off what you completed and move any unfinished items to the next day’s three‑task list. Over a week you’ll see a pattern of what you consistently achieve and where you might need to adjust expectations, all without feeling like you’re juggling a mountain of tasks.
Optional next step: explore a weekly planner
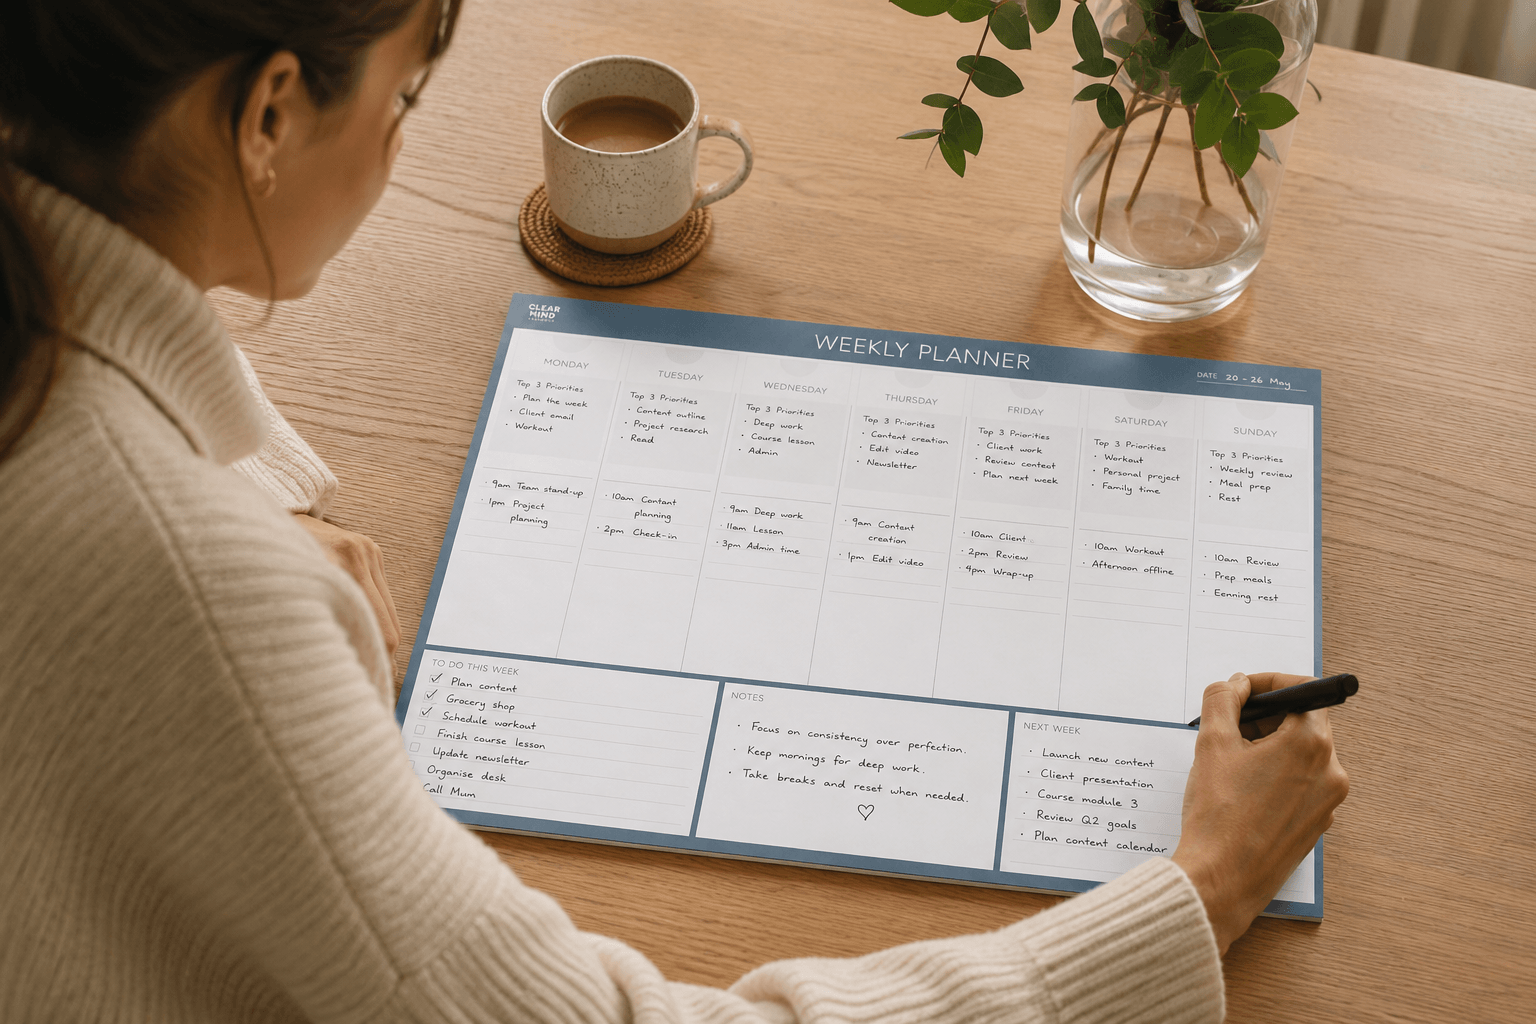
If you enjoy the simplicity of an undated weekly planner, a weekly planner can be a gentle next step. It sits flat on your workspace, giving you a full‑week view at eye level. Seeing the week spread out on a single surface often reduces the need to flip pages and makes it easier to notice gaps for rest or unexpected tasks.
Here is a straightforward way to start using a weekly planner:
- Place the pad on your desk where you sit most often. A clear spot encourages you to glance at it regularly.
- Write the dates for the coming week in the top row. Because it is undated, you can start on any day that fits your schedule.
- Identify your three core priorities for the week. Put each one in the left‑hand column of the corresponding day.
- Use the right‑hand space for time blocks or quick notes. Keep the blocks short – 30‑minute slots work well for most tasks.
On a typical Wednesday you might write “Prepare client report” as the priority in the left column, then block 10 am‑12 pm in the right column for focused work. In the remaining space you could jot a reminder to call the printer at 2 pm. By keeping the layout simple and visible, you can shift tasks without feeling like you’re rewriting a whole system.
Key takeaways
- Spend a few minutes reviewing last week’s wins and unfinished items before opening a new planner page.
- Choose just three core tasks for each day; the top priority gets the most focus, the other two stay short and doable.
- Write your weekly priorities on the left side of the planner, keeping them to three items to stay clear on what matters.
- Mid‑week, pause for a quick check‑in: move unfinished tasks forward, add new urgent items, and delete anything no longer needed.
- End each week with a brief review: note what worked, celebrate one success, and clear the page for the next start.
- If the planner feels crowded, trim tasks to the most essential and let the rest stay in a simple to‑do list.
FAQ
How can I stop overplanning when I use a weekly planner?
Overplanning often starts with trying to fit too many items into each day. Begin by limiting yourself to one top priority and two small tasks per day. Write them in simple language and leave blank space for unexpected events. When you notice the list growing, step back and ask whether each item truly moves you toward your weekly goal. Removing anything that feels optional keeps the planner light and reduces the pressure to complete everything.
What’s the best way to choose tasks for each day in an undated weekly planner?
Pick tasks that match the three‑task rule: one main focus and up to two quick actions. Start by reviewing what you accomplished last week and note any unfinished items that are still important. Then choose the single priority that will make the biggest difference this week, and add two short tasks that can be done in 15‑30 minutes. Write them in the planner’s daily column, using verbs like “call” or “file” to keep the actions clear.
How often should I review and adjust my weekly planner?
A mid‑week check‑in is a gentle way to keep your planner realistic. Set aside 10‑15 minutes on Wednesday to glance at each day’s list. If a task no longer feels relevant, cross it out and replace it with something more pressing. Adjust the top priority only if a higher‑impact item has emerged. This quick review helps you stay flexible without rewriting the whole week, and it keeps the planner feeling supportive rather than restrictive.
Conclusion
By keeping your weekly planner simple, you give yourself space to notice what matters most without the pressure of filling every slot. The quiet habit of a few clear priorities can turn a busy mind into a calmer, more focused one.
Remember, the planner is a tool that works with you, not against you. If you let each week start with a gentle intention rather than a strict checklist, you’ll find planning becomes a source of ease rather than stress.
If you’d like a simple place to put this into practice, our weekly desk pad planners offer an undated, spacious layout that sits open on your desk throughout the week – there when you need it, easy to ignore when you don’t.